Floral Boho Bag · Free Crochet Pattern

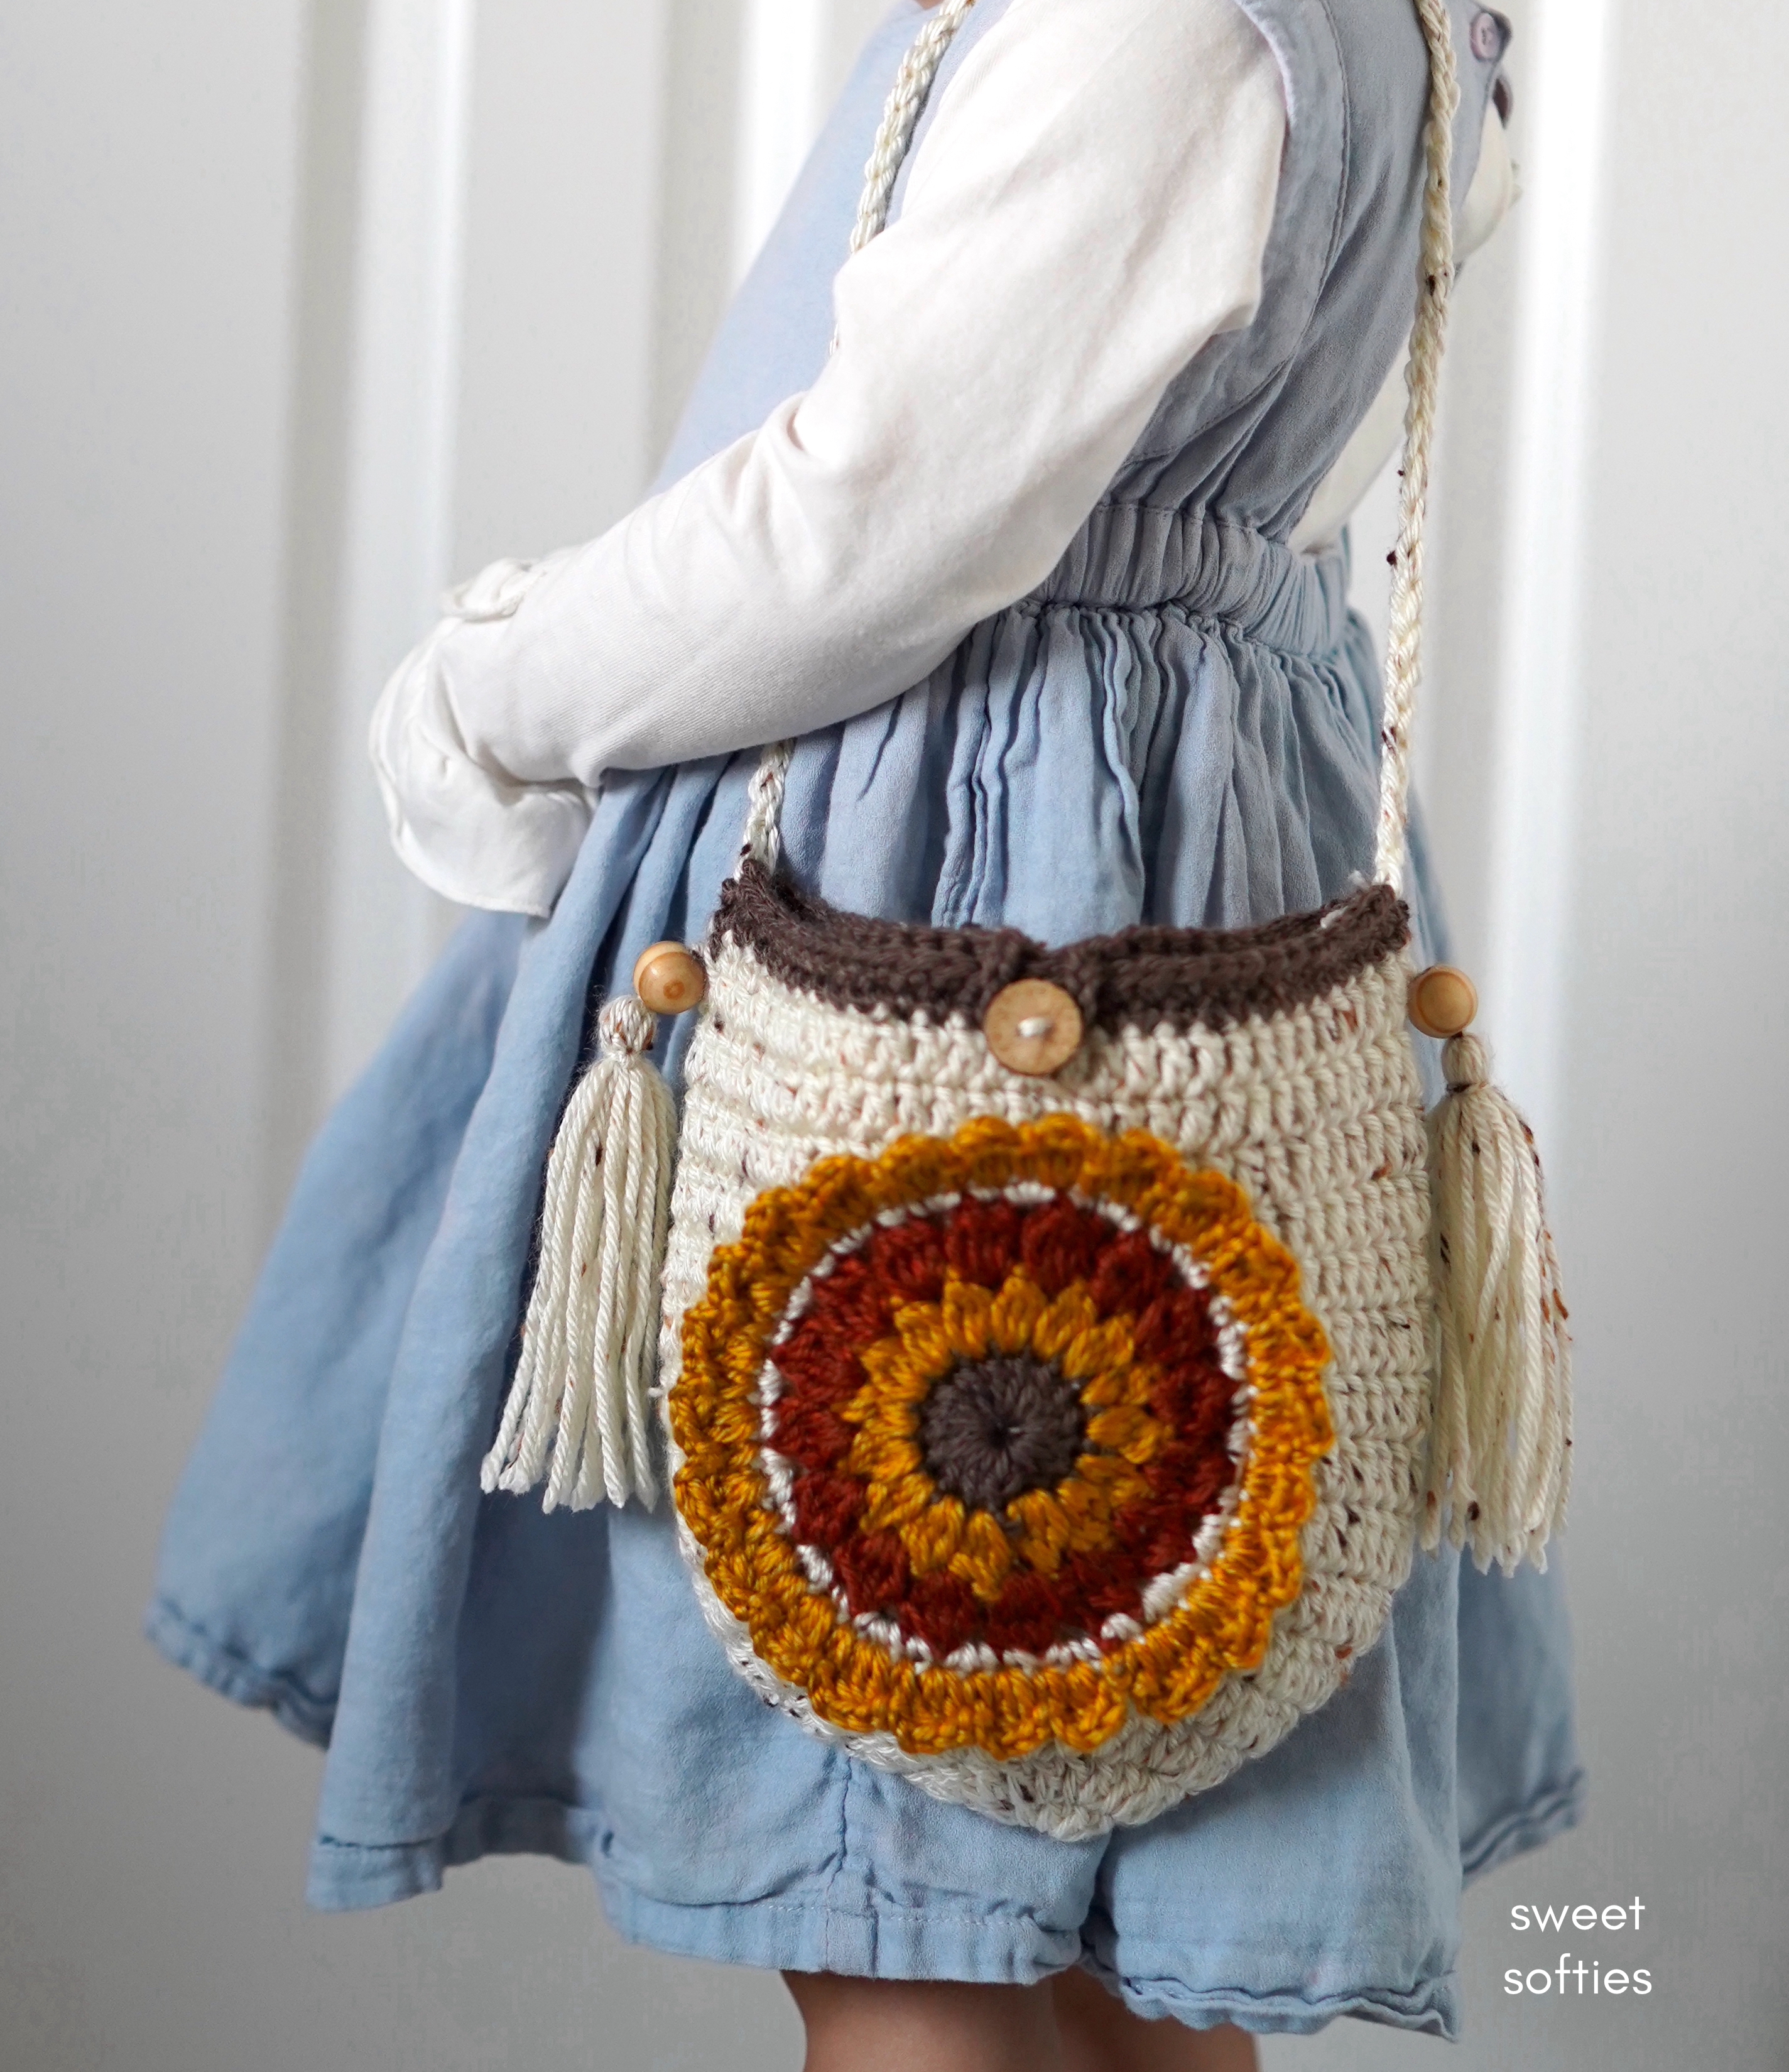
Ready for a project that is functional and practical, but also looks amazing with different color combinations? I'm excited to share with you my design -- the Floral Boho Bag!

Pattern Feature
This Floral Boho bag features a beautiful flower applique, beaded tassels, and a long crossbody strap. It’s a relatively quick and easy project to work up, consisting of mostly double crochet stitches.

This handy, light-weight pouch can be customized with different yarn colors to be suitable for any season or holiday of the year.
The aesthetics can be described as a bohemian, chic, hippie, cottagecore, and woodland style!
Yarn
The yarn I used for designing this pattern includes Lion Brand Heartland and Caron Simply Soft Tweeds. Both are worsted, medium weight 4 yarn, and 100% acrylic.

Gifting & Selling
It’s a trendy and free-spirited accessory that makes a great gift for kids of all ages, from toddlers and children to teens, as well as adults. Give it as a birthday gift, Christmas or holiday gift, or as a craft fair and market product.
If you make these tiny coin pouches from new socks, you can sell it at craft fairs and markets! You can easily whip it up as a last-minute gift for different occasions as well, such as birthdays, holidays, Mother's Day, Father's Day, or as a Memorial gift.
To make this a memorial craft, you can use the sock of a loved one who has passed away and turn it into a special keepsake in memory of them.
To make this a friendship craft or friendship gift, you and your bestie can buy a pair of socks together and create matching pouches!
This trendy, unisex accessory is suitable for all ages and genders. For keyword purposes, that includes: toddler, kids, children, teen, teenagers, adult, girls, women, boys, men.
.jpg)
PDF Pattern
This PDF pattern includes clear written instructions and photo references. It is printable, ad-free, easy to read, and helps support Sweet Softies! (If you enjoy my free patterns, you can consider it as a donation to me when you buy one of my pattern PDFs! It allows me to maintain my blog and continue sharing more free patterns.)

FLORAL BOHO BAG
Free Crochet Pattern
Terms of Use & Copyright Notice © 2023 Sweet Softies (www.sweetsofties.com). You have permission to sell finished products made from this pattern, but you must credit Sweet Softies as the owner/creator of this pattern by linking to my website (www.sweetsofties.com). No wholesale. You may not translate, copy, alter, or sell my patterns in part or in whole in any way. My patterns may not be used in video tutorials or teaching online classes. My patterns may be used in teaching in-person classes ONLY with written consent from me. You may link to this pattern but you may not copy any part of the pattern instructions on other websites.
Crochet Pattern Information
Level of Difficulty:
★★☆☆☆ Easy. Requires familiarity with stitches used (below).
Size:
Height of purse: 8 inches (20 cm)
Width of purse: 8.5 inches (21.5 cm)
Length of straps: recommended length is 30 in. for a child and 40 in. for an adult, but it’s easily adjustable to any length!
Stitches/Terms Used:
- FO = fasten off
- MR = magic ring
- ch = chain
- sl st = slip stitch
- sc = single crochet
- dc = double crochet
- dc-inc = double crochet increase (insert 2 dc in the same st)
Materials:
- Medium weight “4” yarn in desired colors (I used Caron Simply Soft and Lion Brand Heartland yarn)
- 5mm and 6mm crochet hooks
- Yarn needle
- Scissors
- Two wooden beads
- Medium wooden button
- Optional: two 12”x12” fabric squares to line the bag
Crochet Instructions
BAG
Notes: Use a 5mm crochet hook. Join all rounds with a sl st to the first dc (or sc). Start with the main color yarn (cream).R1: Starting with a MR, ch 3 and insert 12 dc. *Join with a sl st to the first dc. (12 dc)
R2: Ch 3, dc-inc around. *Join. (24 dc)
R3: Ch 3, (dc, dc-inc) around. *Join. (36 dc)
R4: Ch 3, (dc 2, dc-inc) around. *Join. (48 dc)
R5: Ch 3, (dc 3, dc-inc) around. *Join. (60 dc)
R6-R15: Ch 3, dc around. *Join. (60 dc)
Switch to the contrast color yarn (brown).
R16: Ch 1, sc around. *Join. (60 sc)
R17: Ch 1, sc 15, ch 10 to make the buttonhole loop. Then, sc in the next st. Continue sc in each of the remaining 44 sts in this round. *Join. (60 sc, 10 ch)
FO and weave in the ends.
STRAPS
Note: Video tutorial of this method is available here.Use medium weight off-white yarn and the same (5mm) hook. The two straps will be attached to the sides of the bag, 15 sts away from both sides of the buttonloop strap. Each strap end will take up 2 stitch spaces.
- Attach yarn to a st, then insert hook into next st and pull a loop up. YO and pull through both loops.
- Make a chain of 30 inches for a child or 40 inches for an adult, or go with your preferred strap length. If you are using stretchy yarn, pull it taut when measuring the strap’s length.
- First, make sure the strap is not twisted before attaching it to the other side. YO and insert hook into the other side of the bag, pulling up a loop. Insert hook into the next st and pull up a loop. Then, YO and pull through both loops.
- Working back along the chains, sl st into the first ch. Then, sl st across in each of the ch.
- You will now be back to where you first started the straps. FO and tightly knot the yarn ends together, then weave them in.
FLORAL APPLIQUE
Note: Use the 6mm hook and switch yarn colors as desired. For reference, my yarn colors are as follows: R1-brown, R2-yellow, R3-red, R4-cream, R5-brown.Special Stitches:
- Beginning Small Cluster (beg-small-cl): ch 3, (YO, insert hook into stitch, YO, pull through, YO, pull through 2 loops on hook) x 2. YO, pull through 3 loops on hook.
- Small cluster (small-cl): (YO, insert hook into stitch, YO, pull through, YO, pull through 2 loops on hook) x 3. YO, pull through 4 loops on hook.
- Beginning Big Cluster (beg-big-cl): ch 3, (YO, insert hook in ch-1 sp, YO, pull through, YO, pull through 2 loops on hook) x 3. YO, pull through 4 loops on hook.
- Big cluster (big-cl): (YO, insert hook in ch-1 sp, YO, pull through, YO, pull through 2 loops on hook) x 4. YO, pull through 5 loops on hook.
R1: Starting with a MR, ch 3 and insert 16 dc in the ring. Join with a sl st to the first dc. (16 dc)
R2: Insert a beg-small-cl in the first st. Ch 1. Insert a (small-cl + ch 1) in each of the next 15 sts in the round. Join with a sl st to the top of the beg-small-cl. (16 clusters)
R3: Sl st into the first ch-1 gap. Insert a beg-big-cl in the same ch-1 gap, then ch 2. Insert (big-cl, ch 2) in each of the next 15 ch-1 gaps. Join with a sl st to the top of the beg-big-cl. (16 clusters)
R4: Ch 1, sc in same st. Insert 2 sc in each of the ch-2 gaps, and 1 sc above each of the big-cl. Repeat around. Join with a sl st to the first sc.
R5: (Ch 2, insert small-cl in next st, ch 2, sc in next st), repeat around. Join with a sl st to the st where you started this round.
FO and weave in the ends.
Finishing Instructions
- Make two beaded tassels using my Easy DIY Tassel Tutorial here, or you can directly check out my video tutorial here.
- Sew the two tassels to both sides of the bag, underneath where the straps are. I chose to attach them between R15-R16 of the bag, where the color change takes place.
- Sew a wooden button to the front-center of the bag, between R15-R16 of the bag, where the color change takes place.
- Sew the floral applique to the body of the bag, centering it underneath the button.
- Optionally, you can include a cloth lining inside of your bag to make it more durable and avoid stretching out. To do so, put the right sides of two 12”x12” fabric squares together. Place the body of the bag over the squares and draw out the approximate size/shape of the bag. Cut out the two pieces of fabric lining. Then, sew the sides of the bottom of the pieces together. Fit the lining inside of the bag and fasten the top edge using either fabric glue, fabric tape, or sewing methods. Here is a tutorial on how to add a fabric lining inside of your crochet bag without the stitches showing.

Congratulations on finishing!
Thank you for reading, and hope you had a fun time crocheting this project! If you'd like to help out my blog, feel free to check out my post, "5 Ways to Support my Blog!"
You might like my other designs if you enjoyed this one! Simply click on the image below for the pattern, or check out all my free patterns here.


I'd love to see your finished work from my designs! Here are links for sharing photos of your creations:
Best wishes,